It is assumed that you have already successfully setup IIS or installed Apache on your machine and configured it. So, to configure PHP and secure its correct operation you need to go through a couple of steps.
- Download and unzip the latest version of PHP
- Rename/copy php.ini-recommended to php.ini
- Create a session state directory and point the session.save_path variable in php.ini to it
- Setup the PHP extensions
- Make sure that PHP folder is in the system path
- Configure IIS
- Configure Apache Web Server
- Test your setup
- Date Setting
- Location of libmysql.dll
Download and unzip the latest version of PHP
Download the latest zipped distribution of PHP from http://php.net. Unzip it. The recommendation is to put all the PHP stuff in a folder just off of the root drive (avoid whitespace), like C:\PHP.
Rename/copy php.ini-recommended to php.ini
In your PHP directory, you’ll find a couple of php.ini-* files. They are pre-configured settings for a PHP install that you can use as an initial setup. The php.ini-recommended is the most secure, hence, the recommended one; just rename it to php.ini and copy to your Windows directory.
Create a session state directory and point the session.save_path variable in php.ini to it
This is optional, but recommended step. PHP does not need sessions, but it’s something that will most likely be useful.
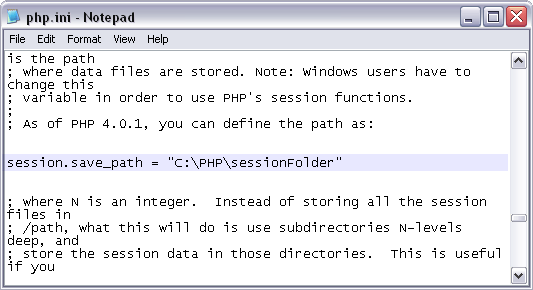
Create a session directory somewhere on the server. I created C:\PHP\sessionFolder. This directory will hold many small files with session variable information for PHP.
Now change the value of the session.save_path variable in php.ini to be the full path to that directory (session.save_path=C:\PHP\sessionFolder).
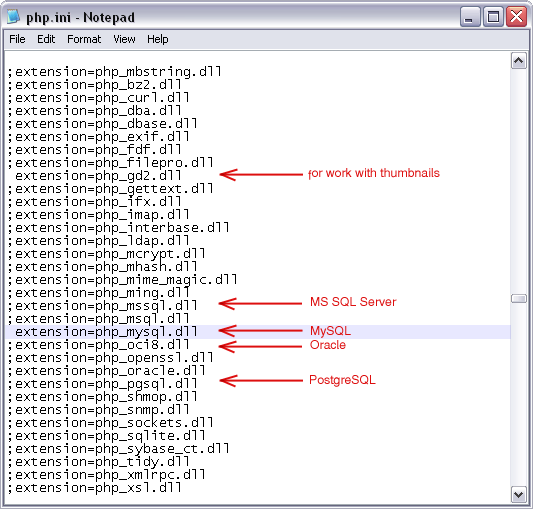
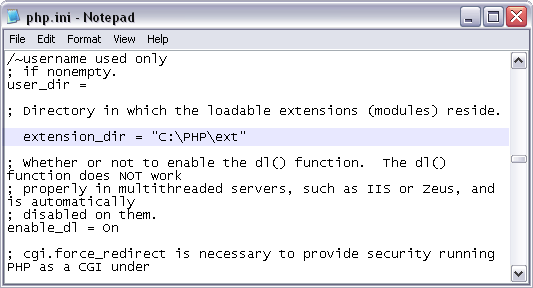
You need to point PHP to the directory that holds the extension libraries and you need to uncomment the desired extensions.
- Point PHP to the correct directory:
Set extension_dir in php.ini to “C:\PHP\ext” (extension_dir = “C:\PHP\ext”) - Uncomment the ones you want to use.
It’s important to be sure that php_mysql.dll extension is uncommented (for PHP 5 or newer).
Make sure that PHP folder is in the system path
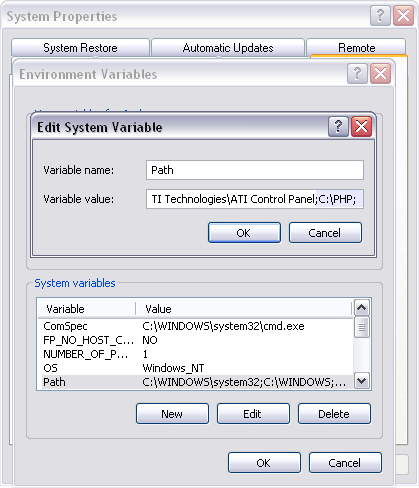
You should add “C:\PHP” to the server’s PATH environment variable:
- Right-click on My Computer, choose Properties
- Flip to the Advanced tab
- Click the Environment Variables button
- Double-click the Path variable in the list of System variables.
- Either add “C:\PHP;” to the beginning or “;C:\PHP” to the end (sans quotes, not both).
- Restart IIS for it to take effect.
(To restart IIS you should right-click the local computer in the left pane of IIS Manager, click on All Tasks -> Restart IIS… -> OK)
Instead, you can copy all non-php dll files from C:\PHP to C:\Windows\System32 (or somewhere else in the server’s PATH), but the first is the preferred method since it keeps the installation in one place, making upgrading or uninstalling easier.
For these steps, open IIS Manager
(Start -> Control Panel -> Administrative Tools -> Internet Information Services (IIS) Manager).
Then add new extension (.php)
- Expand the local computer in the left pane
- Right-click on “Web Sites” in the left pane, then click “Properties” in the menu that pops up
- Flip top the Home Directory tab
- Click “Configuration”
- Flip to the Mappings tab
- Click Add…
- Enter the full path to php5isapi.dll in the “Executable” textbox (Browse… to find it more easily if you need to)
- Enter “.php” in the Extension textbox
- Select radial button Limit to, enter “GET,POST,HEAD”
- Click OK all the way out
This will apply to every website.
This sets up IIS to actually respond to requests for php files. Until now, IIS hadn’t known what to do with php files, you just told it to pass them through php5isapi.dll.
If you want PHP to work with your Apache server, you will need to modify your Apache configuration file to load it. There are two ways to configure Apache to use PHP: one is to configure it to load the PHP interpreter as an Apache module. The other is to configure it to run the PHP interpreter as a CGI binary. Unless you have a particular reason for running PHP as a CGI binary, you will probably want to load PHP as a module in Apache, since it runs more efficiently that way.
To configure Apache to load PHP as a module to parse your PHP scripts you should make some changes in the Apache configuration file, “httpd.conf”, typically found in “c:\Program Files\Apache Group\Apache\conf\”. It also can be accessed from your program files menu.
- Search for the section that has a series of commented out “LoadModule” statements. Add the following line after all the LoadModule statements:
LoadModule php5_module “c:/php/php5apache2.dll” - Search for “AddType” and add the following line after the last “AddType” statement:
AddType application/x-httpd-php .php
If you need to support other file types, like “.php3” and “.phtml”, simply add them to the list, like this:
AddType application/x-httpd-php .php3
AddType application/x-httpd-php .phtml
Create a new file named test.php in one of the websites. Expand the Web Sites folder in the left pane of IIS Manager to see a list of existing websites. Right-click on a website -> Properties -> Home Directory -> Local Path will show you where the website root directory is.
Create test.php file with the following line: <?php phpinfo(); ?>
With your browser go to http://localhost/test.php
After loading test.php, you should see some information about your PHP installation. Be sure to scroll all the way down to the bottom to see that there were no errors. Pay attention to “Configuration File (php.ini) Path” field. Field’s value is current location of php.ini file and you should make appropriate changes in it.
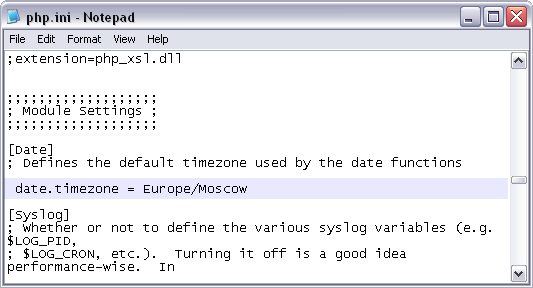
Date Settings (for PHP 5.1 or newer)
It is strongly recommended to configure date settings in php.ini. It is not safe to rely on the system’s time zone settings.
Set date.timezone in php.ini to your time zone (in my example it’s Europe/Moscow).
Complete list of Timezones you can see at http://php.net/manual/en/timezones.php
Lastly, we need to be sure that copy of libmysql.dll is located in PHP folder (for PHP 5.0 or newer).

